March 19, 2021
The COVID-19 pandemic has impacted businesses all over the world. With recent lockdowns and social distancing, businesses are forced to ch...
BookSteam’s New Video Meeting Scheduling tool helps businesses stay online

New Features

The COVID-19 pandemic has impacted businesses all over the world. With recent lockdowns and social distancing, businesses are forced to change their business model in order to stay operational. More and more businesses are implementing online
video scheduling software for their digital services to connect with their client base.
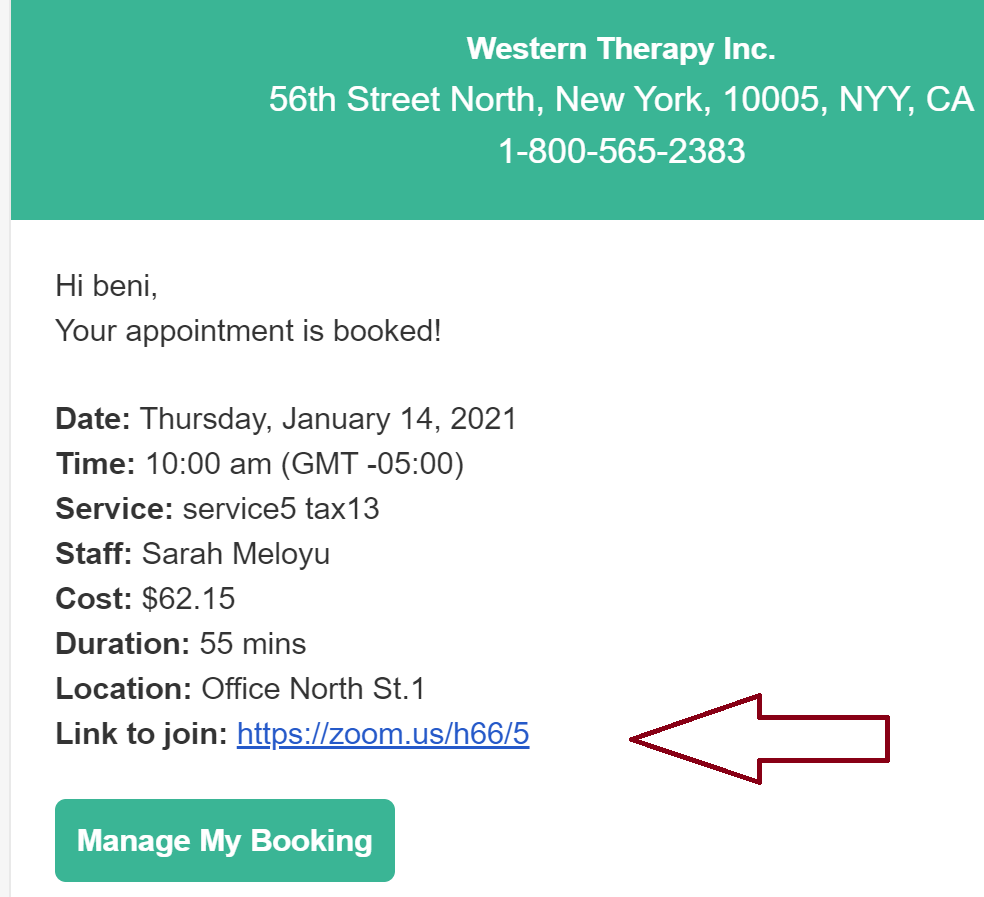
To help businesses succeed, BookSteam released a new highly requested feature, the ability to add video/meeting links (from your favorite video conference software such as Zoom, GoToMeeting, Microsoft Teams, etc) to your services, classes or courses. Integrated video links will be automatically added to the customer email confirmations and reminders.
Get started
To get started with video links, please go to the Settings > Services tab. From there, edit or create new service and in the 'Video Link' section add your meeting link (the same strategy applies to classes and courses).
Staff can also add video link manually and directly to their booking from the Calendar view.
When bookings are made, customers will receive email confirmations and reminders with included video link. Customers will also see included video link in their client portal account.
To learn more about video links, please visit our tutorial
here.
May 12, 2020
Accepting online payments just got easier for BookSteam users. We’re thrilled to announce a new payment integration, Square . Square is one ...
Accept Online Payments via Square

New Features
Accepting online payments just got easier for BookSteam users. We’re thrilled to announce a new payment integration,
Square. Square is one of the largest online payment processors in the world, currently available in the US, Canada, Japan, Australia, and the United Kingdom. New Square payment integration will make it easier for your business to accept secure online payments, while providing further convenience and ease of use to your clientele.
Setup
To enable Square payment gateway, from your BookSteam account, go to the
Settings > Client Payments tab and click "
Connect with Square" button. Sign in to your Square account, if you do not have one, simply sign up for the account directly from within BookSteam. Once connected to the Square gateway, you can specify if you require full payment, a deposit or just a credit card on file when clients book online. Make sure your set
currency in BookSteam matches your currency in Square.
Payment Options
Credit Card Capture
You can request your clients to place a valid credit card on file when booking online. If a client doesn't show up for their scheduled appointment, you can easily charge their card on file.
Deposits
You can request a deposit from your clients at the time of the booking, this ensures that clients are committed to their booked appointments.
Full Amount Payment
You can request a full payment at the time of the booking (money in your pocket with no hassle).
Guide
Start accepting online payment today and let us know if you have any questions, we'd love to hear your opinion.
July 01, 2019
Running a Business? Invoicing is Essential Invoicing may not be the most exciting task when running a business, but it must be done. Inv...
Managing Invoices With BookSteam

New Features

Running a Business? Invoicing is Essential
Invoicing may not be the most exciting task when running a business, but it must be done. Invoices help you get paid and provides legal protection for all parties involved. It's also important to keep a record of all invoices as evidence of income in case of an audit.
We understand that managing invoices can be stressful and time consuming, which is why we highly recommend you start administering your invoicing processes via BookSteam.
You can easily record, manage, print or send invoices all within BookSteam, so take a look at how we deconstruct everything below!
Raising an Invoice
Checking a client out? You can easily do so by navigating to the 'Calendar' tab and select the '+' sign and hit 'Sale'.
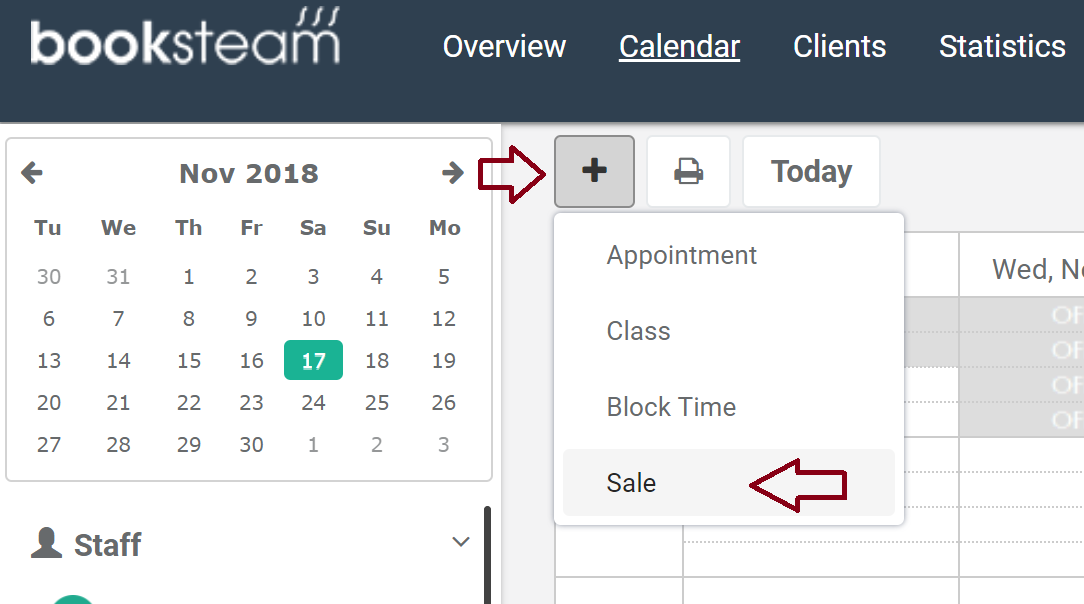
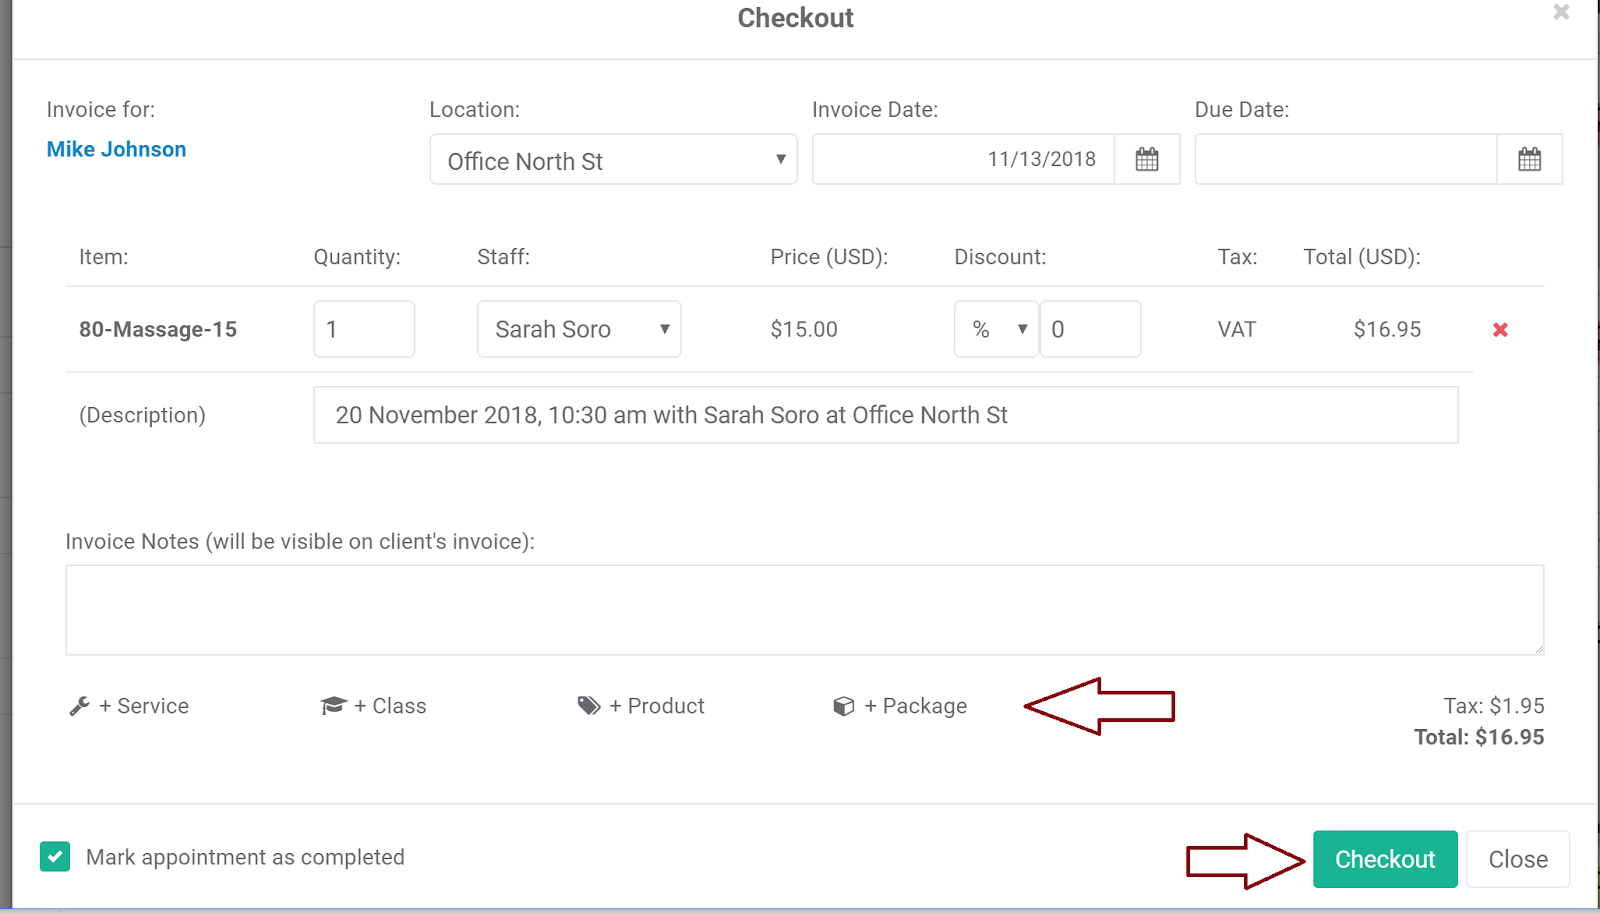
You can then add a service, class, product, or package to the invoice and hit 'Checkout'. Now if you are looking to raise an invoice from an appointment or class, go to the calendar view and then select the class or appointment you are raising an invoice for. If you are raising an invoice for an appointment, select the blue 'Checkout' button in the appointment window. If you need to raise an invoice for a class in the calendar view, simply select the 'Clients' tab in the class window and under the client, select the invoice button.
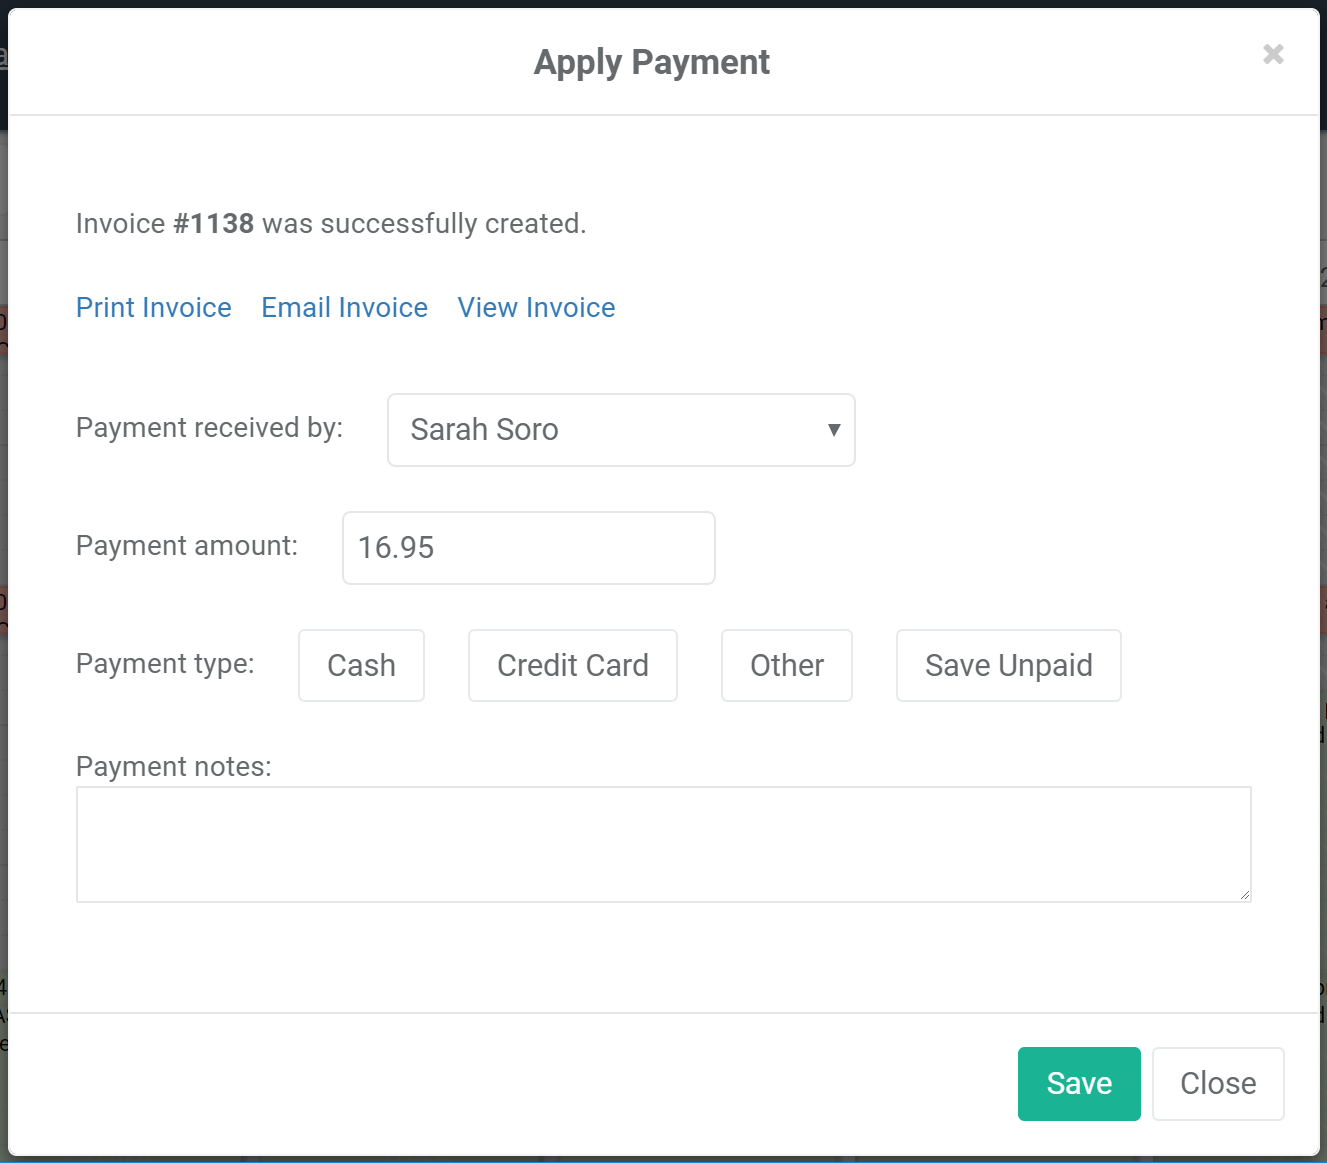
In the next window, you can apply payment for the generated invoice. Just select the payment type, enter in any payment notes and hit 'Save'. You can also print, email the invoice or view the invoice all within the same window.
Tracking Invoices
Interested in viewing all of the invoices? Travel to the 'Analytics' tab and select 'Reports' once you're in the Reports section, go to the Financial column and select either 'Invoices Summary' or 'Unpaid Invoices' in order to review all transactions that were recorded or tracked through BookSteam.
You can also raise an invoice through a clients profile as well. All you have to do is navigate to the 'Clients' tab, select the clients name and click on the 'Invoices' tab.
Keeping everything in the same spot makes everything easier and helps streamline your business. Interested in learning more?
Sign-up for our FREE 14-day trial and stay tuned for more tips and tricks on our blog.
May 20, 2019
Taking your service on the road? We've got the feature for that. Becoming mobile just got easier with BookSteam. Whethe...
NEW! Mobile Service

New Features
Taking your service on the road?
We've got the feature for that.
Becoming mobile just got easier with BookSteam. Whether you're a massage therapist, hair stylist, or a private tutor - you can now easily collect your client's address information for any of your mobile services in just four easy steps.
Step One
In the BookSteam platform, navigate to Settings > Services and select 'Add New Service' button.
Step Two
Once you're in the service settings select the 'Mobile service (client's address required)' option and select 'Save'.
Step Three
Now, when the clients go to book online, they will be required to enter their address, which in turn will be the location Staff will travel to for the service.
Step Four
You or your staff will now see the client's address in the appointment window. Staff will be able to edit the location or directly load the mobile address into Google Maps.
Staff will also receive an email confirmation with the client's address for the booking.
You can also add client's address to the 'Client Email Notification Messages' by using {CUSTOMER_MOBILE_ADDRESS} variable.
Stay tuned for more and exciting features coming soon!
May 17, 2019
Looking for features that are customized to your business? Look No Further! Introducing our NEW customizable Client Informa...
NEW! Customize your Client Information Fields to your Business

New Features
Looking for features that are customized to your business?
Look No Further!
Introducing our NEW customizable Client Information Fields! You can now easily customize your client information fields in the 'Settings' section of your BookSteam account.
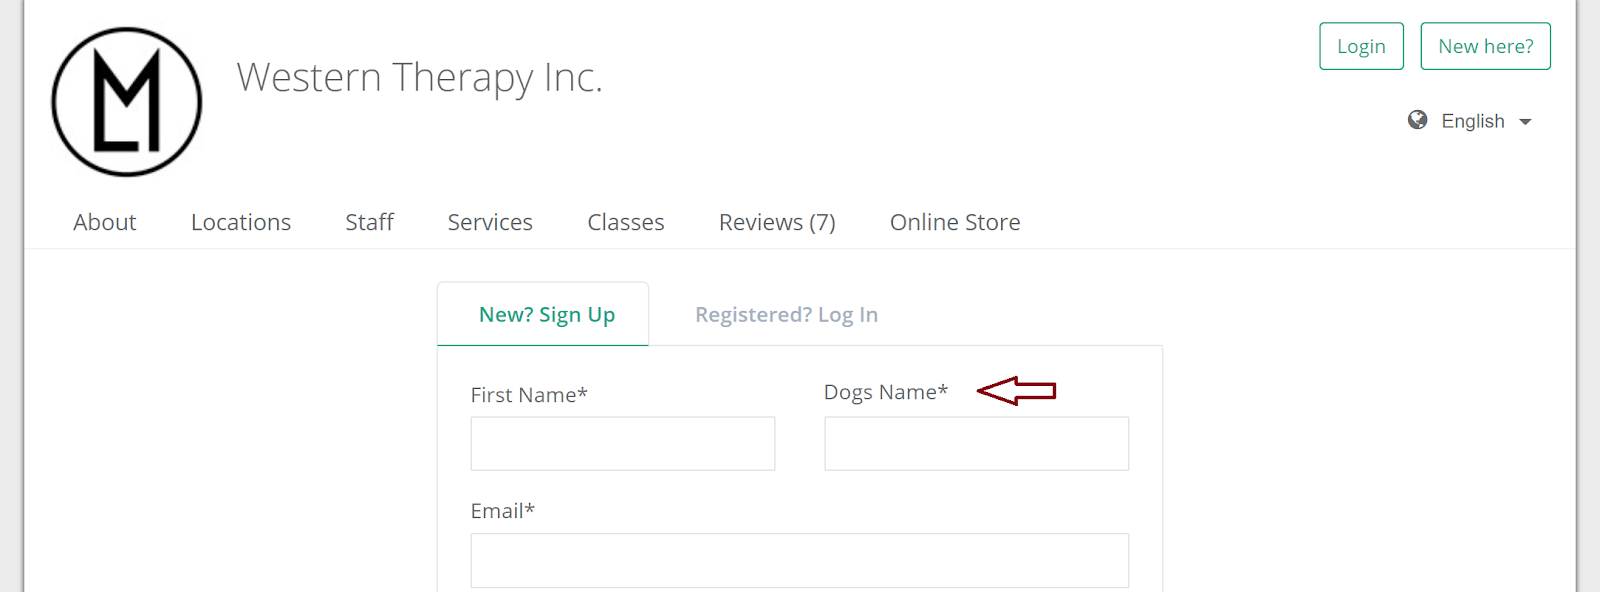
Let's say you're the owner of a Pet Grooming Service and not only do you need to know the name of your Client, but it's also VERY important to know the name of your Client's pet.
Well, now you can easily customize or edit the Client Information Fields in your client's profile to keep track of your client's pets name.
To customize your Client Information Fields and re-arrange them, just go to Settings > Preferences > Client Info Fields. The field labels and their order will be reflected in the client's profile and on the booking page as well.
If you want to change the order of the Client Info Fields, click the grey bar on the left hand side of the field and drag/drop accordingly.
Example for your pet grooming business, change the 'Last Name' field to 'Dog's Name' by clicking 'Edit' and modifying the name field.
Once you select 'Visible to clients on your booking page' this feature will allow your clients to see the new field when they are booking online. The 'Required' option will make that field required when clients book online.
Select 'Save' and clients will now be able to see the new modified fields on your booking page.
Then, in the client's profile, the 'Last Name' field will also be modified into the 'Dog's Name' field.
Clients who have registered will also see these fields in their account.
And voila! You officially know how to customize client fields to your business.
For more details, see our help link section here.
Stay tuned for more and exciting features coming soon!
May 15, 2019
This just in, you can now tag your clients to easily identify or sort through them! Need an Example? Let's say you ...
NEW! Client Tags

New Features
This just in, you can now tag your clients to easily identify or sort through them!
Need an Example?
Let's say you are the owner of a spa and one of your clients only gets a Deep Tissue Massage with a specific type of oil as his or her's skin is very sensitive. You can easily tag the type of massage she gets (Deep Tissue Massage) and the oil she prefers (Insert Specific Oil Name/Brand) in the 'Clients' tab under his or her's profile name.
'Tags' is located at the bottom, right hand corner of the client's profile. Under the 'Tags' menu, type in your tag and select the '+' button. Select 'Save' or 'Update' and the new tag(s) will automatically be tagged to your client's profile.
Another great benefit about the 'Tags' feature is instead of looking up the clients by their first/last name when making a booking - you can simply enter a tag in the name field and all linked clients will appear.
Stay tuned for more and exciting features coming soon!
February 27, 2018
Another awesome feature from BookSteam! Clients can now book multiple participants per class session. Need an example? Mi...
NEW! Book Multiple Participants Per Class

New Features
Another awesome feature from BookSteam! Clients can now book multiple participants per class session.
Need an example?
Mike has two kids, Jill and Emily, who both love Math. Mike wants to enroll both of his kids into the mathematics class. School that offers math classes uses BookSteam to schedule classes online. Mike goes to the school's BookSteam booking page, selects two participants, picks class date/time, enters information for both kids and books the class. It's that easy!
Now set it up in your account!
Go to 'Settings'>'Preferences'>'Scheduling Rules' and then select 'Clients can book multiple participants' option and click 'Save' at the bottom of the page.
For more details, see our help link section here.
Stay tuned for more exciting new features coming soon.
January 26, 2018
We're excited to let you know that the staff future working hours, one of your most requested features, is now live! ...
NEW! Setup Future Working Hours For Staff

New Features
We're excited to let you know that the staff future working hours, one of your most requested features, is now live!
You can now setup future working hours for Staff members. Perfect for those staff members who have fluctuating schedules throughout the year. For example, in January staff, Jenna, is working Monday through Friday 9:00am to 5:00pm, but in February it changes to 11:00am to 6:00pm.
To set it up, simply go to the staff profile (located under Settings/Staff), open 'Working Hours' tab, select 'Future working hours for location:' option and click '+Add' button.
From there, set your new future working hours and click 'Save'.
For more details see our help link by clicking here. Alternatively, see all other time management tools for Staff here.
Stay tuned for more exciting updates. New features coming soon.
September 23, 2017
You heard that right! With our latest feature, clients can now book recurring appointment or class sessions online. T...
Clients Can Now Book Recurring Sessions Online

New Features
You heard that right!
With our latest feature, clients can now book recurring appointment or class sessions online.
To activate this feature please navigate to the Settings > Preferences > Scheduling Rules tab, enable recurring option for appointments and/or classes and click 'Save'.
When clients book online, they will be presented with the option to book single or recurring session.
For more new and exciting BookSteam updates, make sure to stay tuned.
Want to learn more about BookSteam? Check out our Support Center here.
May 29, 2017
We Heard Your Feedback We received many emails from our customers requesting for classes to be displayed in a list view on their bookin...
NEW! List View For Class Bookings

New Features

We Heard Your Feedback
We received many emails from our customers requesting for classes to be displayed in a list view on their booking page.
Well, your wish is our command! We are excited to announce that this amazing feature is finally here!
Where can you find it, you ask?
You can switch to List view in the Settings > Preferences > Scheduling Rules tab under Class Rules section.
Show me an example of this List view!
Display or Hide days with no classes
In the list view, you can display or hide days that do not have scheduled classes. This option is located in the Settings > Preferences > Scheduling Rules tab under Class Rules section.
Bonus feature
You can also display cancelled class in the list. Simply cancel class from your calendar as usual and in the cancellation option select 'Display this cancelled class in your online schedule' and click 'Yes'.
on your booking page Cancelled class will be displayed
To view difference between List view and Calendar view see this help link.
March 21, 2017
Resource scheduling was the most anticipated feature of this year and it's finally here. Resource scheduling can be use...
NEW! Resource Scheduling Is Here!

New Features
Resource scheduling was the most anticipated feature of this year and it's finally here. Resource scheduling can be used to reserve rooms or equipment which are linked to your services, preventing double bookings.
Let's get started.
First, you need to create resources
Adding resources is super easy, simply go to Settings > Resources and click "Add New Resource" button. Add as many resources as you'd like and specify their location.
For more information view our help link here.
Second, assign created resources to services or classes
Under Settings > Services edit your service and link resources based on location (same applies to classes).
For more detailed instructions click here.
Finally, booking with resources
From your calendar, in the new appointment window you will see new resource selection (system will automatically assign first available resource but you can select another one).
Resource allocation from online bookings will be done automatically, resources will be assigned based on their availability.
For more details see out quick help guide.
Overview of resources in calendar
View booked resources in one quick glance from your BookSteam calendar.
For more info click here.
Another ground breaking feature from BookSteam that helps your business with resource management. For a complete resource scheduling tutorial click here: http://booksteam.com/Support.aspx?sid=1130
January 23, 2017
We're starting off 2017 with a bang! Two new awesome features have been added to BookSteam: the ability to add multiple services to ...
NEW! Add Multiple Services To An Appointment + Service Groups

New Features

We're starting off 2017 with a bang! Two new awesome features have been added to BookSteam: the ability to add multiple services to an appointment and service groups!
Adding multiple services to an appointment
Some businesses require the ability to add more than one service to a single appointment. With our latest feature, you're now able to do just that; add many services to a single appointment with the ability to modify staff, time, duration and price, on a fly. To get started view our help link at
http://booksteam.com/Support.aspx?sid=1&aid=1126&s=How-to-add-multiple-services-to-an-appointment
Service Groups
With service groups you are able to group services you perform together, such as wash, color and blow-dry. You can also add 'available time' to the service group (in between services) which will open up that time for other bookings. Adding service group to the calendar is easy, in the calendar tab simply click 'add new appointment' and under Service select
created service group. For more details follow our help guide at
http://booksteam.com/Support.aspx?sid=1127
Stay tuned for more updates and to learn more about the platform, click
here.
October 18, 2016
We’ve got some exciting news for of all the e-commerce businesses out there. Today we released a new feature, promotions or...
NEW! Promotional Codes

New Features
We’ve got some exciting news for of all
the e-commerce businesses out there. Today we released a new feature, promotions or more
specifically - advanced promotional codes. You’ll want to use this as soon as you hear
how useful this feature is and how it can spur your revenue.
This simple, yet effective, marketing strategy gives your
customers yet another reason to book your services. What promotional codes can do is
market your services on your e-commerce site with a special discount. This
discount is linked to a specific code that allows customers to get the offer.
Promotional codes, also known as discount or coupon codes,
consist of numbers and/or letters (e.g. ‘50OFF’) that you choose yourself.
These special codes are extremely successful as they urge people to book, which is
good for both your business and your customers. They are also very easy to use, so
even less computer savvy individuals will be able to enjoy this feature. But don’t take our word for it, scientific research has confirmed that
incentives such as these affect people’s happiness and their overall approach
to shopping/booking. What’s also great, promotional codes work well with both, returning and first-time customers.
What are the key features of these promotional codes?
- Promo codes can be linked to the specific services, classes, staff members and locations (even if locations are in different timezones).
- Selected discount can be a percentage or a fixed dollar amount.
- Code availability (when code can be used) can have a date range, set hours or selected days (e.g. Monday, Wednesday, Friday).
- Booking window (for the days services can be booked online) can also have date ranges, set hours and various days.
- Code usage limit can be set on a global scale or per client.
Show me how to create a Promo code
For detailed instructions on how to create a promotion code and other tips and tricks please see our support help link at https://booksteam.com/Support.aspx?sid=1121
So, what’s your excuse? Jump on the bandwagon and start promoting!
Stay tuned for more features and to learn more about the platform, click here.
September 12, 2016
Another major feature release: multi languages! We've translated client side booking page and clients' management panel ...
BookSteam Is Now Available In Multi Languages

New Features
Another major feature release: multi languages! We've translated client side booking page and clients' management panel into French (Français), Spanish (Español), Italian (Italiano), Portuguese (Português), Russian (Русский), Norwegian (Norsk), Chinese (中文), Japanese (日本語) and German (Deutsche). We will be adding more languages in the near future, stay tuned.
Where is it?
Multi language preference is located in the Marketing>Mini Webpage tab under 'Language Preference'.
What if my customers speak different languages?
Not a problem, you can let your customers choose their preferred language by enabling additional languages.
Once enabled, your customers will be able to select their preferred language on your booking page.
Please note, that administrative back-end of the BookSteam account is still in English (we're planning to offer translations in the near future).
If you have any questions or feedback drop us a line.









Follow Us