November 21, 2014
As email users, we all receive a lot of spam. Internet Service Providers (ISPs) are using filter algorithms to try and keep spam/junk ou...
Whitelisting - How to ensure that our emails will go to your inbox

November 2014
Whitelisting - How to ensure that our emails will go to your inbox
by
BookSteam
November 21, 2014

As email users, we all receive a lot of spam. Internet Service Providers (ISPs) are using filter algorithms to try and keep spam/junk out of customers' inboxes. Sometimes, they accidentally filter the email that you want to receive. In many cases you are not notified (and neither are we) that booksteam.com email didn't make it through.
To make sure that booksteam.com emails are not filtered into your “spam”, "junk" or "bulk" folder, please add booksteam.com to your list of trusted senders.
Gmail
Sign into Gmail and click on the Gear icon in upper-right corner of the screen.
Select the "Settings" menu. Click on the "Filters" tab at the top of the screen.
Click on the "Create a new filter" link at the bottom of the screen.
Type "@booksteam.com" under From (not including the quotation marks).
Click on the "Create filter with this search >>" link.
Make sure "Never send it to Spam" is checked.
Click Create filter.
Yahoo! Mail
Sign into Yahoo! mail and click on the Gear icon in upper-right corner of the screen.
Select the "Settings" menu. Click "Filters" on the left hand side.
On the Filters page, click “Add”. In the "Filter Name" type in booksteam.
In the “From” (make sure “contains” option selected) add booksteam.com
At the bottom where it says "Then move the message to this folder" make sure ‘Inbox’ is selected.
Click "Save".
Outlook Mail
Sign into Outlook mail and click on the Gear icon in upper-right corner of the screen.
Select the "Options" menu.
Under "Preventing junk email" click on "Safe and blocked senders".
Click on "Safe senders".
Under "Sender or domain to mark as safe:" type in booksteam.com and click "Add to list>>"
You're done.
November 05, 2014
In this blog we'll show you how to integrate BookSteam BookNow button with your Wordpress.com page. Let's start: 1. Login into yo...
Adding 'BookNow' button to your Wordpress.com page

November 2014
Adding 'BookNow' button to your Wordpress.com page
by
BookSteam
November 05, 2014
In this blog we'll show you how to integrate BookSteam BookNow button with your Wordpress.com page. Let's start:
1. Login into your Wordpress account here.
2. Now, click the page or post that you want to edit.
3. Login into your BookSteam account here.
4.
Navigate to the "Marketing" tab, and on the left hand
side
select "BookNow Button", select size of the button you prefer and copy
your code, see below.
5. Go back to your Wordpress account, make sure you click Text tab, and paste your BookSteam code. Click Publish or Update.
6. "Book
Now" button now added to your Wordpress website. Your clients
can now visit your live webpage and begin scheduling their appointments.
And you're all set! Thank you for choosing BookSteam.
Related blog posts: GoDaddy, Google Sites, Jimdo, Joomla, Squarespace, Weebly, Wix, Yola
November 04, 2014
Integrating BookSteam scheduling links with your Squarespace.com website is easy. In few simple steps you'll be ready to accept booking...
BookSteam integration with Squarespace.com

November 2014
BookSteam integration with Squarespace.com
by
BookSteam
November 04, 2014
Integrating BookSteam scheduling links with your Squarespace.com website is easy. In few simple steps you'll be ready to accept bookings online.
1. In Squarespace, open your design page, and click Edit.
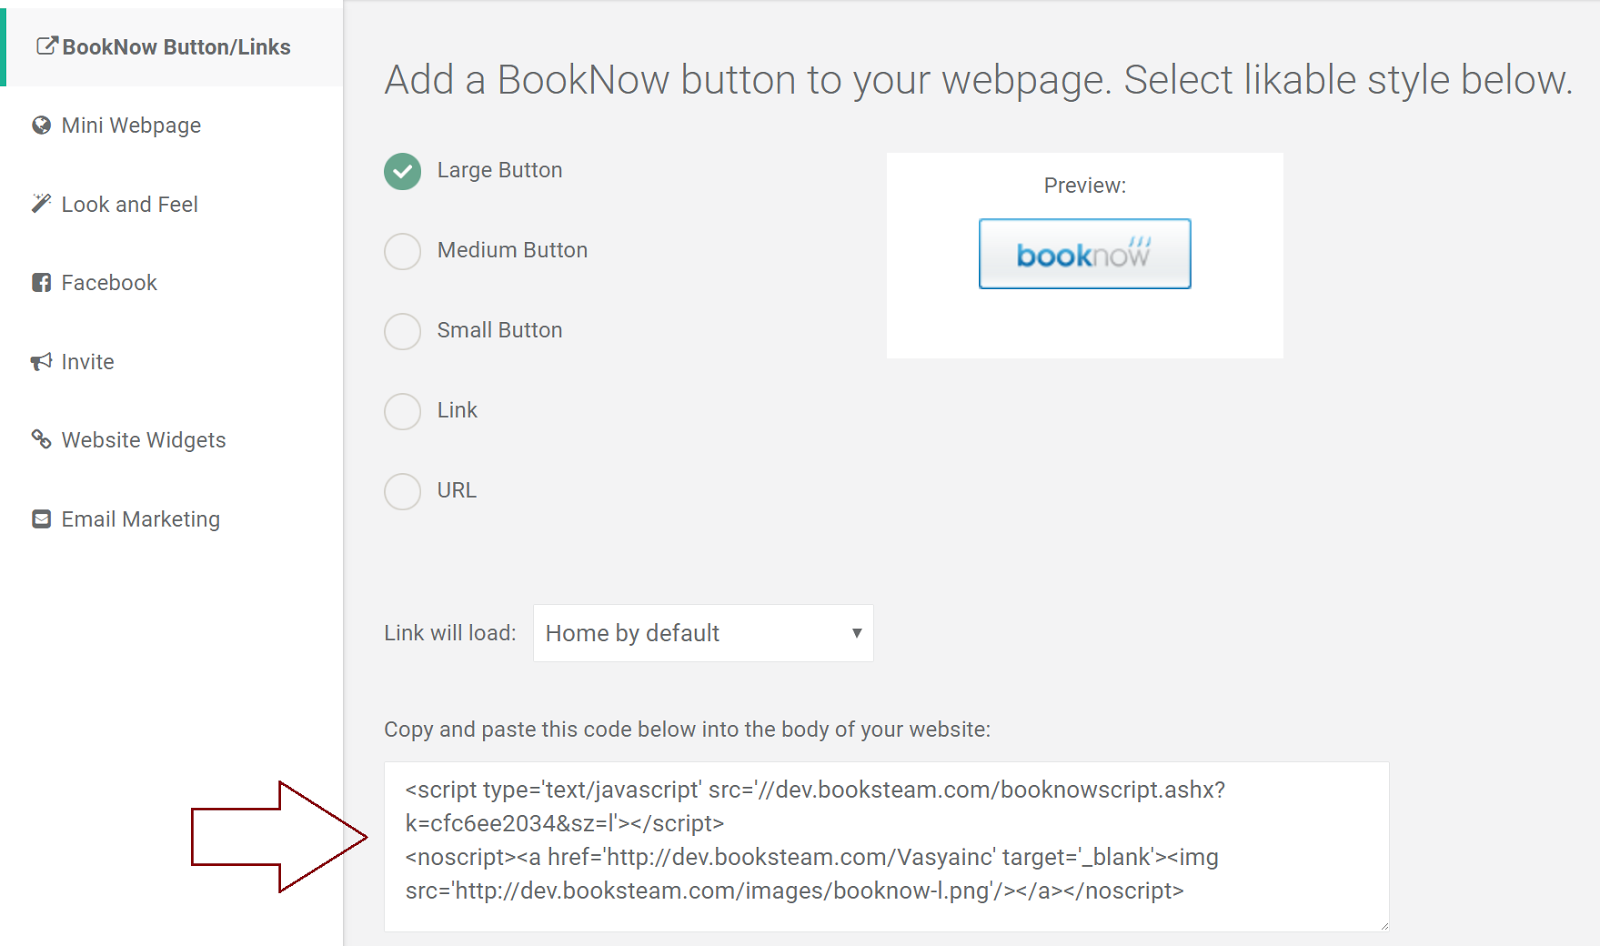
2. In your BookSteam account, navigate to the "Marketing" tab, on the left hand side click "BookNow Button/Links" tab, select size of the button you prefer and copy your code.
3. Go back to your Squarespace design block, click on Insert Point where you would like to add your scheduling link.
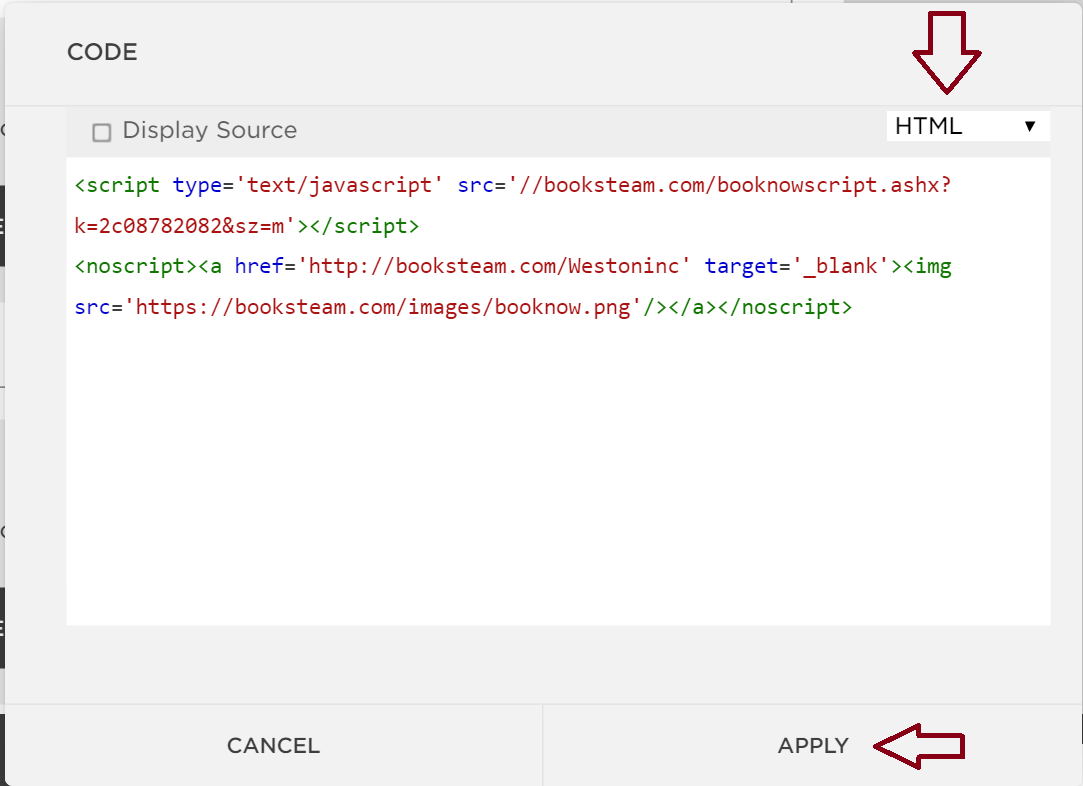
4. In the Block menu scroll down to More and choose Code Block.
5. Make sure the drop down menu in the editor is set to HTML before adding your code. Paste your BookSteam code and click APPLY.
6. Click SAVE on your Page Editor.
7. "Book
Now" button has been added to your Squarespace webpage.
And you're done! Your clients can now visit your live website and start booking their appointments online.
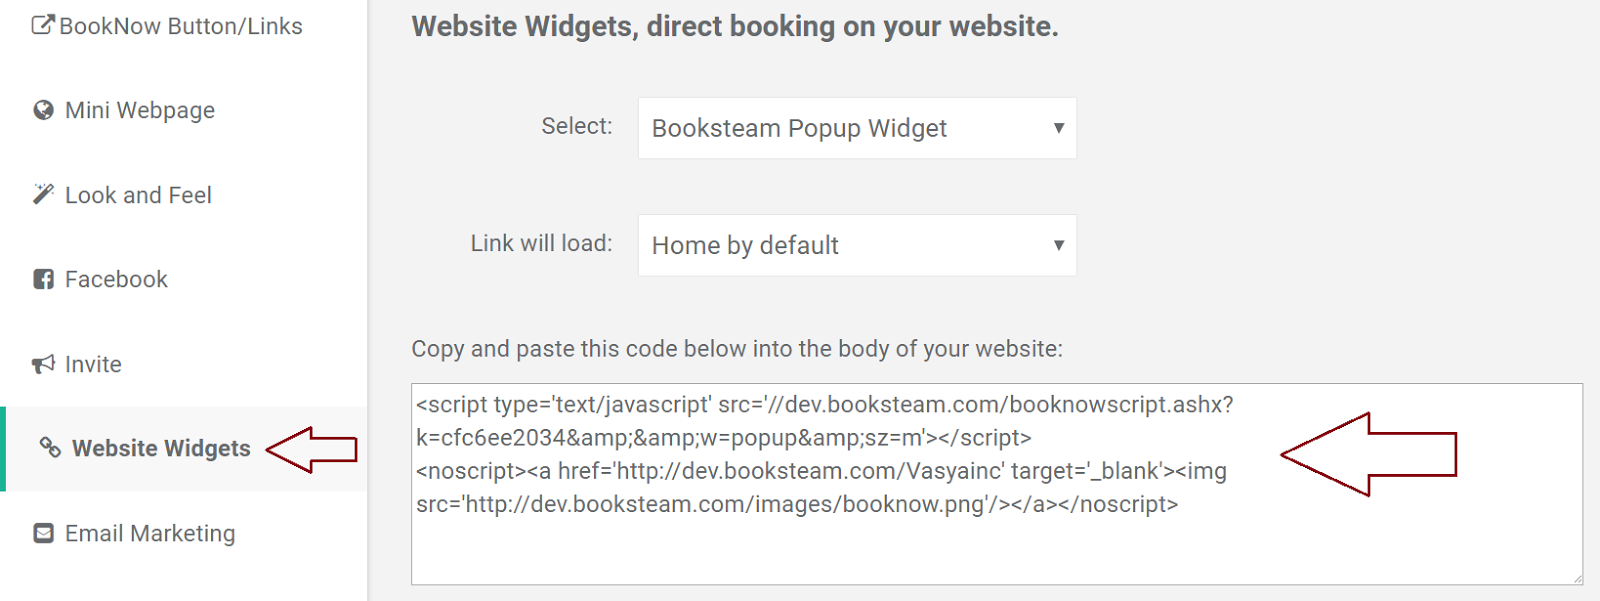
Note: For integrating website widgets (popup or direct in-body booking on your Squarespace webpage), in your
BookSteam account navigate to the 'Marketing' tab, on the left hand side click 'Website Widgets' tab. Choose 'BookSteam widget in body' or 'BookSteam popup
widget', select which link to load (if you want to load main page just
leave it default) and then copy the code below.
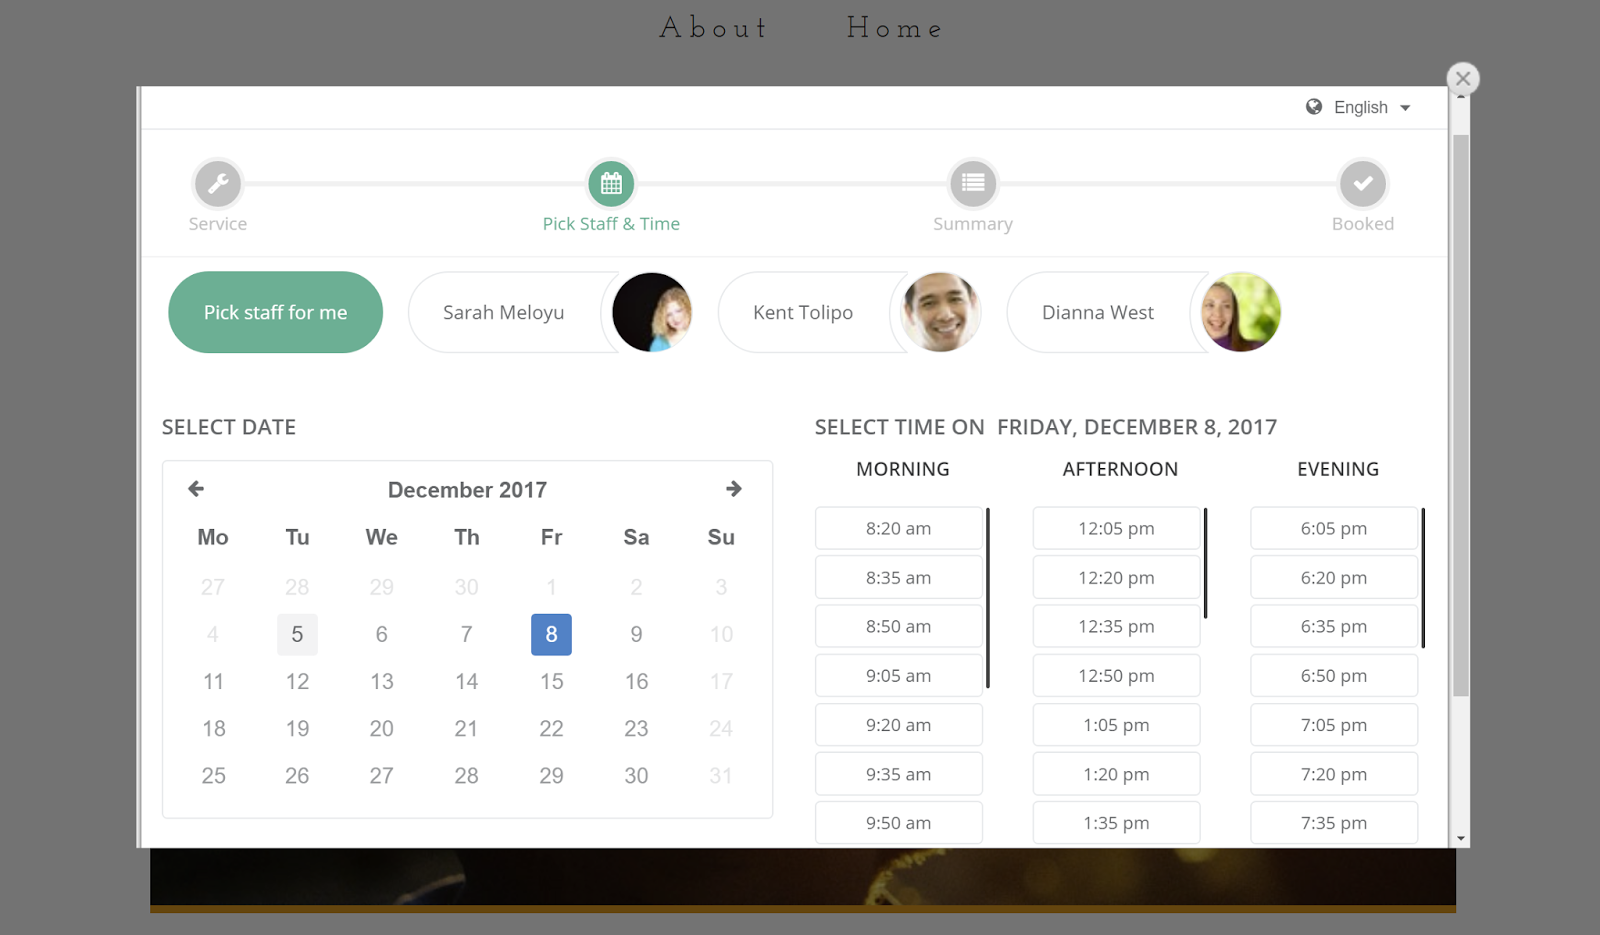
Then, follow step 3, 4, 5 and 6 above. After you 'SAVE', 'BookSteam Popup Widget' will look like this:
and 'BookSteam Widget in Body' will look this way
For more information visit Squarespace help link for adding html to your website.
Related blog posts: GoDaddy, Google Sites, Jimdo, Joomla, Weebly, Wix, Wordpress, Yola


